 创建nuget包(C++/WinRT)

# 准备工作
首先我们需要准备好Visual Studio 2022 (opens new window)与nuget.exe (opens new window)
提示
nuget.exe需要加到系统Path中
# 代码生成
# UWP项目
我们需要有一个Windows 运行时组件(Windows Runtime Component) 项目

# 编译器设置
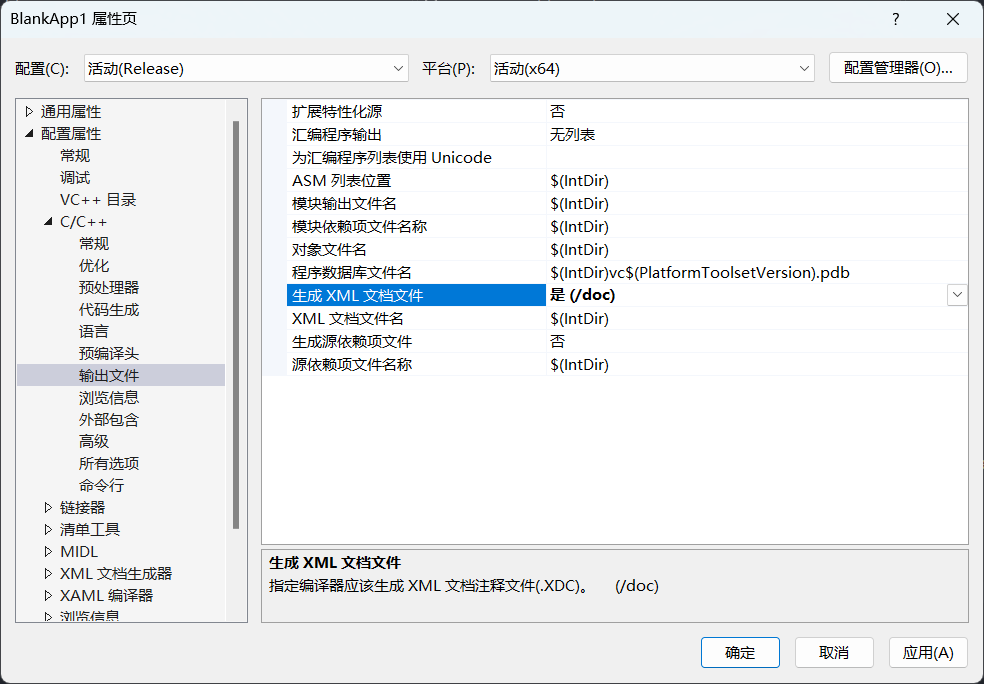
然后设置输出注释文件,以实现注释说明
项目 → 属性 然后按下图设置

# 编译代码
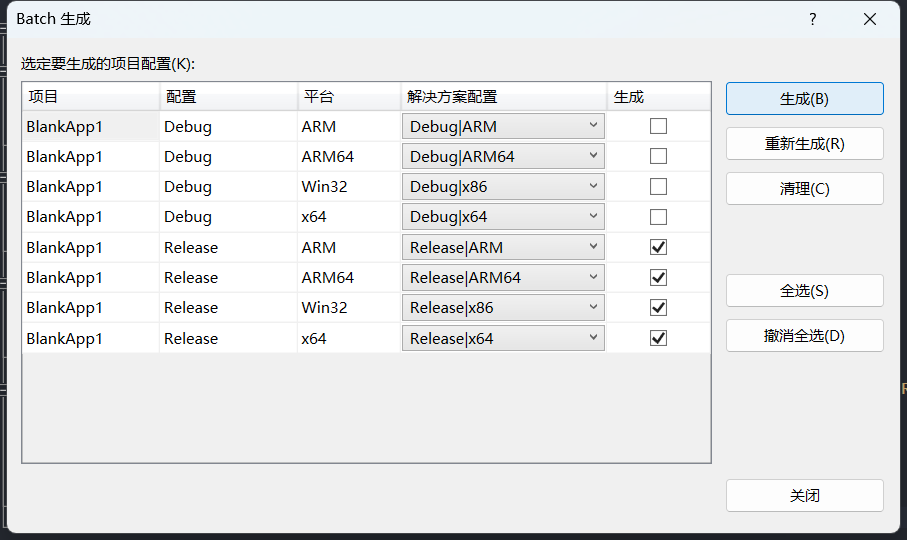
然后我们就可以打包我们的代码了
生成 → 批生成 然后按自己需要的平台设置需要生成的代码(本文以所有平台进行示例)

# 打包成nuget
# 创建并更新.nuspec文件
首先展示我们的项目结构:
📦 BikaClient              # 项目名称
├── 📂 BikaClient          # 主体代码
│   └── ...
├── 📂 ARM                 # 编译完的代码
├── 📂 ARM64               # 编译完的代码
├── 📂 x64                 # 编译完的代码
├── 📂 Release             # 编译完的代码
├── 📜 BikaClient.sln      # 解决方案
├── 📜 BikaClient.targets
├── 📜 BikaClient.nuspec
└── 📜 ...
1
2
3
4
5
6
7
8
9
10
11
2
3
4
5
6
7
8
9
10
11
我们在当前目录,即有解决方案(.sln文件)的文件夹里创建BikaClient.nuspec文件(BikaClient换成你项目名称)
也可以在当前文件夹中直接使用指令生成
nuget spec
1
在文件中键入
<?xml version="1.0"?>
<package >
  <metadata>
    <id>BikaClient</id>
    <version>0.0.3</version>
    <title>BikaClient</title>
    <authors>KitUIN</authors>
    <owners>KitUIN</owners>
    <license type="expression">MIT</license>
    <projectUrl>https://github.com/KitUIN/BikaClient</projectUrl>
    <requireLicenseAcceptance>false</requireLicenseAcceptance>
    <description>BikaClient</description>
    <copyright>Copyright 2022-2022</copyright>
    <icon>images\small-logo.png</icon>
    <iconUrl>https://raw.githubusercontent.com/wiki/KitUIN/BikaClient/image/small-logo.png</iconUrl>
    <tags>uwp</tags>
    <dependencies>
      <group targetFramework="UAP10.0">
        <dependency id="Microsoft.UI.Xaml" version="2.7.1"/>
        <dependency id="Microsoft.Windows.CppWinRT" version="2.0.210806.1"/>
        <dependency id="VC-LTL" version="5.0.5" />
        <dependency id="YY.NuGet.Import.Helper" version="1.0.0.4" />
      </group>
    </dependencies>
  </metadata>
  <files>
    <!-- WinMd and IntelliSense files -->
    <file src=".\Release\BikaClient\BikaClient.winmd" target="lib\uap10.0"/>
    <file src=".\x64\Release\BikaClient\BikaClient.xml" target="lib\uap10.0"/>
    <!-- DLLs and resources -->
    <file src=".\ARM\Release\BikaClient\BikaClient.dll" target="runtimes\win10-arm\native"/>
    <file src=".\ARM\Release\BikaClient\BikaClient.pri" target="runtimes\win10-arm\native"/>

    <file src=".\ARM64\Release\BikaClient\BikaClient.dll" target="runtimes\win10-arm64\native"/>
    <file src=".\ARM64\Release\BikaClient\BikaClient.pri" target="runtimes\win10-arm64\native"/>

    <file src=".\x64\Release\BikaClient\BikaClient.dll" target="runtimes\win10-x64\native"/>
    <file src=".\x64\Release\BikaClient\BikaClient.pri" target="runtimes\win10-x64\native"/>

    <file src=".\Release\BikaClient\BikaClient.dll" target="runtimes\win10-x86\native"/>
    <file src=".\Release\BikaClient\BikaClient.pri" target="runtimes\win10-x86\native"/>
    <!-- .targets -->
    <file src="BikaClient.targets" target="build\native"/>
    <!-- Docs -->
    <file src=".\README.md" target="content"/>
    <file src=".\BikaClient\LICENSE" target="content"/>
    <file src=".\small-logo.png" target="images\small-logo.png" />

  </files>
</package>
1
2
3
4
5
6
7
8
9
10
11
12
13
14
15
16
17
18
19
20
21
22
23
24
25
26
27
28
29
30
31
32
33
34
35
36
37
38
39
40
41
42
43
44
45
46
47
48
49
50
2
3
4
5
6
7
8
9
10
11
12
13
14
15
16
17
18
19
20
21
22
23
24
25
26
27
28
29
30
31
32
33
34
35
36
37
38
39
40
41
42
43
44
45
46
47
48
49
50
接下来进行说明:
package                         # 包
├──metadata                     # 元数据
│   ├──id                       # 包名(唯一)
│   ├──version                  # 包版本
│   ├──title                    # 包显示的名字
│   ├──authors                  # 作者
│   ├──owners                   # 所有者
│   ├──license                  # 项目所使用的开源许可证
│   ├──requireLicenseAcceptance # 是否需要接受许可证
│   ├──projectUrl               # 项目地址
│   ├──description              # 说明
│   ├──copyright                # 版权说明
│   ├──icon                     # 包图标
│   ├──iconUrl                  # 包图标地址
│   ├──tags                     # 标签
│   └──dependencies             # 依赖
│       └──group                # 依赖组
│           ├──dependency       # 依赖1
│           ├──dependency       # 依赖2
│           └── ...             # 依赖...
└──files                        # 包内文件
    └──file                     # 包内文件
1
2
3
4
5
6
7
8
9
10
11
12
13
14
15
16
17
18
19
20
21
22
2
3
4
5
6
7
8
9
10
11
12
13
14
15
16
17
18
19
20
21
22
metadata部分依样画葫芦就行
dependencies一般是指所依赖的nuget库
在生成的四个文件夹选一个.winmd与.xml按以下结构书写,这是包的winmd主体代码
<!-- WinMd and IntelliSense files -->
<file src=".\Release\BikaClient\BikaClient.winmd" target="lib\uap10.0"/>
<file src=".\x64\Release\BikaClient\BikaClient.xml" target="lib\uap10.0"/>
1
2
3
2
3
.targets文件很重要,这里我们需要自己写(依旧是项目名.targets的命名)
将下面代码复制,将里面BikaClient都换成你的项目名字
<?xml version="1.0" encoding="utf-8"?>
<Project xmlns="http://schemas.microsoft.com/developer/msbuild/2003">
    <PropertyGroup>
        <BikaClient-Platform Condition="'$(Platform)' == 'Win32'">x86</BikaClient-Platform>
        <BikaClient-Platform Condition="'$(Platform)' != 'Win32'">$(Platform)</BikaClient-Platform>
    </PropertyGroup>
    <ItemGroup Condition="'$(TargetPlatformIdentifier)' == 'UAP'">
        <Reference Include="$(MSBuildThisFileDirectory)..\..\lib\uap10.0\BikaClient.winmd">
            <Implementation>BikaClient.dll</Implementation>
        </Reference>
    <ReferenceCopyLocalPaths Include="$(MSBuildThisFileDirectory)..\..\runtimes\win10-$(BikaClient-Platform)\native\BikaClient.dll" />
    </ItemGroup>
</Project>
1
2
3
4
5
6
7
8
9
10
11
12
13
2
3
4
5
6
7
8
9
10
11
12
13
随后保存,并且指定target
<!-- .targets -->
<file src="BikaClient.targets" target="build\native"/>
1
2
2
随后将不同平台的.dll文件指向包内不同平台的target中
<!-- DLLs and resources -->
<file src=".\ARM\Release\BikaClient\BikaClient.dll" target="runtimes\win10-arm\native"/>
<file src=".\ARM\Release\BikaClient\BikaClient.pri" target="runtimes\win10-arm\native"/>
1
2
3
2
3
如果有需要,可以将杂项也一并放入包中
<!-- Docs -->
<file src=".\README.md" target="content"/>
<file src=".\BikaClient\LICENSE" target="content"/>
<file src=".\small-logo.png" target="images\small-logo.png" />
1
2
3
4
2
3
4
若要在组件中包含XAML控件,需要添加具有默认控件模板的XAML文件
<!-- XAML controls -->
<file src="Themes\Generic.xaml" target="lib\uap10.0\Themes"/>
1
2
2
# 打包
直接使用命令打包即可
nuget pack
1
# 上传
上传与一般nuget包并无区别
上次更新: 2022/05/17, 22:09:19